Comments by users revealed a shortcoming of My Expenses’ feature of planning recurrent transactions: Users expect them to be visible in their transaction list, before the date arrives, so that they can already see the influence of the transaction on their budget. Until now, you could apply the template underlying a plan at any time, but the created transactions were then independent from the actual plan instances, and did not prevent the creation of a new transaction once the date arrived.
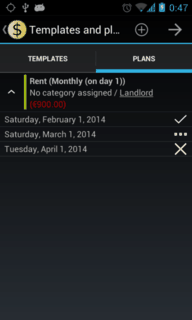
With version 1.11.5, a new way of organizing plans is introduced. Plans are listed in their own tab separate from simple templates. Plans can be expanded and will show a list of the instances that will occur during the next 90 days:

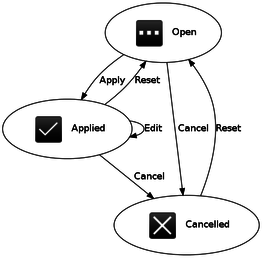
An instance can now be in one of three states: open, applied or cancelled. The following state diagram shows the icons symbolising these states and the actions (callable from the context menu) that lead to transitions between them:

 When an instance is open, you can apply it,
by either saving it directly to the database, or by visiting an editing form before saving.
You can also cancel it, i.e. you flag it to be skipped when the date arrives.
 When an instance is applied, you can edit
the transaction (alter any details), cancel it (the transaction
will be deleted and the instance flagged to be skipped), or reset it (the transaction will be deleted
and created normally when the instance occurs).
 When an instance is cancelled, you can reset it (thus removing the cancellation flag and having it
be handled normally like an open instance again).
If you have a suggestion on how to improve My Expenses’ planner still further, please leave a comment on the Google Plus item linked to this post.