Export and import
Export and import is primarily intended for exchanging data with other finance applications, like desktop finance tools or spreadsheets. My Expenses allows to export data in two formats: QIF and CSV. QIF is supported by many finance tools, like Grisbi, Gnucash, MS Money or Quicken. This allows you to use My Expenses as a companion data entry tool for these applications. But if you decide to move to My Expenses as your primary finance tool from them, you can also import QIF data that you have exported there. Export to CSV (comma-separated values) is primarily interesting if you want to analyze your data with MS Excel or Open/Libre Office Calc.

The export command applies to individual accounts and is available from the action bar or the overflow menu. The exported transactions are marked as exported, and next time you call the export command, you will have the option to export only transactions that have not yet been previously exported. You can also decide to delete the exported transactions.
As a premium feature you can apply the command to multiple accounts in batch from the aggregate transaction list.
The export file is created on the external file system in a special application folder by default. You can set up a different folder from the settings, you can also decide to hand over the data to another application after each export, for example Email, or cloud storage by activating the option “Share exports and backups” in the Settings screen.
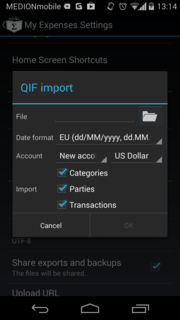
Import functionality is available from the Settings screen. My Expenses mainly supports import from QIF data. When you select a file for import, you have the following options as can be seen on the screenshot:

- Should the dates in the file be interpreted according to the convention mainly used in the US (MM/dd/yyyy) or in Europe (dd/MM/yyyy). Please pay attention to selecting the correct format here, since otherwise the imported transactions will have corrupted dates.
- Should the data be imported into a new account or into an existing one. If you go for the new account, you also need to select a currency.
- You can also decice to not import all information, but only categories, parties or transactions.
My Expenses also allows you to import categories and parties from a Grisbi XML file as explained in the FAQ.
Backup and restore
When you create a backup of MyExpenses’ settings and database (from the Settings screen), you create an archive that cannot be imported into other applications, but is meant to be restored at a later moment on the same or on a different device. You will also be offered the possibility of sending the backup by email, or storing in the cloud if “Share exports and backups” is activated.
The restore dialog allows to select a file. Dependent on your device and Android version, different applications will be suggested to you for this selection, it might be a file manager for the local file system, or a cloud storage provider. Unfortunately there is a bug in Google Drive on Android below 4.4, which offers you to pick a file, but throws an error when My Expenses tries to open the file. If this happens to be your case, you will need to copy the file locally, and import it from there.
Prior to version 2.1.5, backups have not been packaged into ZIP archives, but stored in dedicated subfolders of the application folder. You can still import these backups through the “Restore (legacy data)” command. It will look for these folders in the application folder, and offer you to select the one you want to restore.
Be aware that restoring a backup will delete the data currently held by the application.
As always, comments and suggestions are welcome through MyExpenses’ Google+ page.